Transforming scraps into gems…

This simple, modern necklace uses leftover scraps from various wet-felting projects. I cut three circles in different sizes and blanket stitched their edges with a matching color thread. The circles were then layered and affixed with fabric glue. Stainless steel washers on both sides provide contrast and reinforce the hole for the leather lacing. This item is for sale on Etsy.

This felted wall hanging lacks a proper name…

After making several of these felted mats with integral bowls (I can’t come up with a name that isn’t just a description), I was inspired to make a similar design as a wall hanging. Although I meant for the bowl to be more of a pocket, it is tilted upwards just enough to be able to hold moss and an air plant. The piece is secured to the wall using simple thumbtacks that are covered with leftover felt. I will keep making these and playing with the bowl shape and angle. I envision a whole grid of them on a wall in varying natural alpaca colors.

Back to the name dilemma. What would you call this piece? Maybe just a real name, like Susan? Or a made up name like cars models – The AVRA. Anyway, I will consider any and all suggestions. In the meantime, this item is for sale on Etsy

Embracing the mistakes in making…

Wet felting is a very organic process for me. I figure things out as I go. Therefore…I am constantly making mistakes that I have to incorporate. (I rarely just throw something away.) Since I am often changing mediums and therefore almost always experimenting, I make a lot of mistakes. But for me, these are opportunities rather than failures.
For this particular felted wool vessel, I wet felted natural alpaca roving around a ball. Because I wanted the walls of the vessel to be rather thick, I wrapped about six layers of roving around a three inch diameter ball. If you have ever done any felting, then you know the unwieldy mound of fluff that six layers becomes. Conventional felting wisdom recommends using pre-felted pieces, or needle felting before wet felting in order to prevent the layers from slipping around. But I just go ahead and wet felt the whole thing. And the layers slip. And bunch. And do all sorts of uncontrolled things. Wrinkles form. The overall shape is imperfect. And for a moment I am disappointed; maybe I even put the misshapen vessel aside for awhile. But I don’t forget it. I look at it every now and then while continuing with other projects.
And then one day an idea comes to me. I decide to highlight the wrinkles by stitching a pattern in wool yarn. Thus the wrinkles are meant to be. They give purpose to the stitching which in turn enhances an otherwise plain vessel.
And that is a perfect example of my creative process; organic, experimental, inclusive, additive.

This item is for sale on Etsy

Take a simple craft outside and scale it GIANT…

A beautiful setting for crafting in nature; a grove of Ponderosas next to the rambling Tumalo creek. Students from kindergarten through 5th grade each wove part of a giant god’s eye on 8’ lodgepoles. This change in scale was an idea that came to me while I was researching ideas for a collaborative, kid-friendly project. Most children (and adults) have made a small god’s eye at some point. In native cultures, a god’s eye is used as a connection to the spirit world through the very center of the weaving. Outdoor school provides an opportunity for the kid’s to connect to the spirit of nature. Changing the scale of the god’s eye to GIANT made it a collaborative project rather than an individual craft. And the large scale emphasized its presence in nature – an amplification of the spirit of the earth. While weaving, children were also looking through the god’s eye to the creek and cliffs in the background. It was a magical experience.

The children chose their weaving yarn from a large collection of thrift yarns as well as several colorful t-shirt yarns I hand cut from thrift T-shirts. Denim “yarn” that I made from thrift jeans separates sections of the kid’s weaving and helps tie together the otherwise diverse collection of yarns. At the end of the day, the god’s eye was only have full. Given the scale of the weaving (and the small population of the school) I’ve invited faculty and staff to add to the god’s eye after the summer break.

Create your own t-shirt yarn…

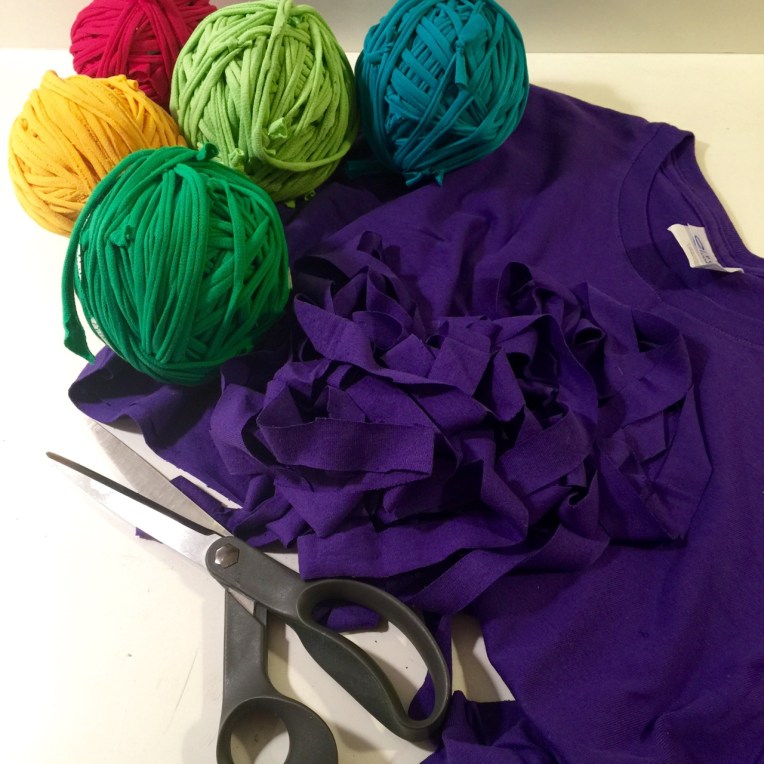
I will be working with kids from kindergarten through 5th grade on a giant weaving project this Friday. Pictured above is the t-shirt yarn I’ve been making for this weaving adventure. Each ball skein is wound with strips that I hand cut, stretched, and tied from one single t-shirt.

This process works best on a t-shirt that does not have side seams. After cutting off the bottom hem and trimming off the seam, I then the hem along the fold and created two strips of fabric. I pull them to stretch the fabric and make it curl along its length, then tie the strips together. Then I cut a spiral from the bottom of the t-shirt up to the arms – a single 1″ wide strip cut at a slight angle to the bottom of the t-shirt. I continue to cut individual 1″ strips between the arms and then also spiral cut the arms. The only remnants are the ribbed neck and a bit of material below the neck. I tend to prefer fewer knots in my t-shirt yarn, so if a strip is less than 12″ long, I don’t use it in the yarn. But I do save all remnants because they make good stuffing for other sewing projects like my upcycled wool blanket poufs.

The process of creating a single skein of t-shirt yarn takes about 45 minutes. But the effort is worth it when I imagine the vivid colors and textures in the god’s eye.

Finishing the unfinished…

Sometimes a project you thought was finished begs for a little more attention. I wet felted and needle felted these decorative trivets a while ago, but was never completely satisfied. I then had a moment of inspiration when I decided to hand stitch one edge of each of the needle felted strips to emphasize the striped pattern as well as the handmade character of the trivets. Now they are finished, and are offered for sale on Etsy

Wet felting surprises; using inclusions…

It is unusual for me to make anything more than once. New inspiration combined with an insatiable desire to experiment with new materials and techniques means I often make one and am done. But these felted vessels have held my interest. They are challenging yet can be made in a few hours. The process is familiar but little variations create interesting surprises. And of course, I just love wet felting. For this piece, I used black alpaca roving for the mat, but included a couple layers of white roving to cover the inclusion (a large Easter egg) before covering the whole piece again with more black roving. During the felting process, the white roving started to blend with the black making the vessel a dark gray. Once the inclusion was removed, the white was exposed on the inside of the vessel, creating a nice contrast with the black mat.

What I love about wet felting…

What I love about felting is the process – which is both demanding and forgiving; repetitive (meditative) and very physical (yes, muscle.) I can be precise or loose and still create something interesting. Mistakes can be opportunities.

I received some natural alpaca roving from Benvenuti Farm and decided to make another mat with integral vase or bowl. I love this minimal, modern design and need to come up with a more fitting name than “mat vase.”

This can be made in about 2 hours depending on the size and the inclusion. I first roughly needle felted four small mats which I then joined into a larger square. Then I placed an inclusion (a large Easter egg) on the square and covered it with cream roving and then with the tan roving to create a reveal of color on the inside when the egg is removed after felting. The whole piece is carefully wet felted so the inclusion does not shift around and so the thickness of felt remains consistent. When it feels complete, I cut out the egg and then wet felt the final piece one more time to make sure the interior of the vase is also tight and smooth. I let it sit overnight to dry and then I trim three sides and leave the fourth raw. The vase is the perfect size for a small potted succulent, an air plant, or some dried herbs or twigs.


Minimalist decor for the modern home…

This set of handmade trivets was wet felted from a blend of natural merino and alpaca wool roving. 1/8” thick mats were cut into 10” and 8” squares. The remnant cut edges were then needle felted onto the squares to create a minimal vertical appliqué. Aside from the functional (and obvious) use as a trivet, I can imagine a whole wall covered in a grid of these minimalist felted squares. Like warm, textural wallpaper. Or more simply, they could be applied to a square piece of homosote and used as a pin-up board. I could also sew them into a quilt or create six quilted panels that are then sewn into a modern cube pouf. Lots of ideas and probably not enough time or focus for me to realize all of them.