
Day 202 – Super simple alteration of a boxy t-shirt I got on our trip to Cape Cod. It has been saved from the sleep shirt pile. (Taken with Instagram)
Day 202 – Super simple alteration of a boxy t-shirt I got on our trip to Cape Cod. It has been saved from the sleep shirt pile. (Taken with Instagram)

Day 199 – Faux fur vest is a bit oversized, but she loves it anyway. “Me, pink!” She can wear/love it for years. (Taken with Instagram)
Day 197 – Working on a tasseled bolero for my 7 yr old. Details tomorrow. (Taken with Instagram)


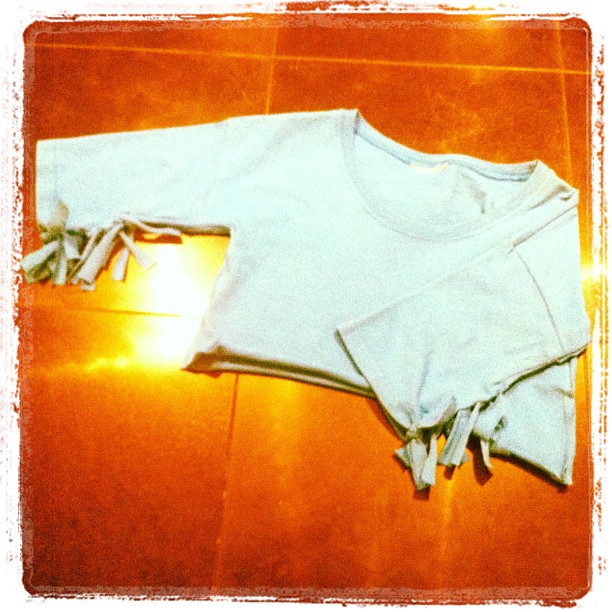
Day 4 – Merged and altered t-shirts
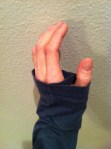
This is relatively easy shirt to make as long as you know how to use a sewing machine. I cut off the sleeves of a shirt I never wear, and I found an XXL t-shirt at Goodwill to use as the main body. I sewed the sides and sleeves of the XXL t-shirt to create a tapered fit, then attached the long sleeves so they are extra long. Simple details using embroidery stitches and leftover t-shirt material cover the existing graphic. I also added thumb holes in the extra long sleeves, and then hid the holes with a patch in the same material.


The early years of elementary school are all about loosing baby teeth. My own daughter has lost a couple while at school – never to be found again. She was devastated and worried that the tooth fairy would not visit her without a tooth to trade. I convinced her that the tooth fairy is very clever and never makes a mistake. None-the-less, I am also kind of disappointed when a tooth goes missing, so I decided to create a tooth saver bag to give to teachers. Entirely hand sewn, the brightly hued bags are made from recycled t-shirts, felt, and ribbon. Kids proudly wear them during the day at school, keeping their tooth safe until they can bring it home and deposit it under their pillow.

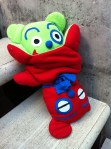
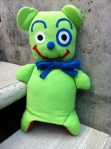

I’ve been working on an idea for a reversible bear for awhile now. This is my first prototype, made entirely by hand because I could not figure out how to sew it on my machine. I bought a rainbow assortment of t-shirts from Goodwill. Complementary colors, green and red, heighten the contrast between the awake bear and the asleep bear. As with all prototypes, there are several things that I would do differently next time. But for now, my 10 month old loves playing with this one.


I absolutely love the originality and quirkiness of John Murphy’s Stupid Sock Creatures. These two crazy figures are made with Red Heel socks and are based on “Red Wetty” and “Estelle” found in Murphy’s book called, of course, Stupid Sock Creatures.

Fur hats are more than head warmers. I found some handmade versions online that will make you stand out in a crowd as well as lift your spirits. Just try to keep a frown while wearing one of these hot pink creations with ears. I cobbled together my own version, and you can too. Or if you’d rather buy one, try these sellers on Etsy. mspresto, doriumlux and gobbolino


So your kid just drew the cutest little creature, and you are thinking “That would make a great stuffed animal!” Whether for fun, or because you believe you’ve just designed the next Ugly Doll, with a moderate amount of time and skill, you can create your very own plush toy. But just remember that when your work is completed, you may actually prefer to display it high on a shelf rather than hand it over to your kid as a toy.
This fuzzy, pink creature, named Reesy, was inspired by my 3 yr old daughter’s sketch. I scoured the Fashion District in downtown LA for inspiring fabric and notions, choosing a mottled, hot pink, polyester, tassel fabric for the body; blue buttons and white pleather for the eyes; velvet cord and faux fur for the tail; and a polyester glitter spandex fabric for the tongue.
My daughter’s sketch was drawn on a post-it note, so I enlarged it on my copier to be about 12″ in length. This just seemed like the right size to cuddle. Using the sketch as a pattern, I cut out two pieces of fabric for the sides adding a 1/2″ seam allowance, and then cut a long 3″ wide strip that I sewed from mouth to tail to give the creature more girth. I also created a 3″ wide bottom piece with legs to match the two sides. I added the eyes before sewing the sides to the middle strip. I sewed a small piece of 1/2″ batting between the two pieces of the glitter spandex for the tongue and then stitched a strip down the middle to make it more like a tongue. This was a creative interpretation of the line extending down from the head in my daughter’s sketch. I have to admit that my daughter hates that Reesy is always sticking out her tongue, but she loves the furry tail; both are examples of artistic license.
If you are inspired to make a plush creature from your child’s sketch, but are not very skilled with sewing, you can instead create a simple pillow by cutting out two copies of the sketch in your chosen fabric, sewing it around the perimeter (leaving a 2″ hole for stuffing,) stuffing it like a pillow shape, and hand stitching the hole closed. Be sure to add at least 1/2″ for the seam allowance. And the easiest possible option for making a plush from your child’s drawing? Just photocopy the sketch onto inkjet-ready fabric; cut it out using at least a 1/2″ seam allowance; sew it up, leaving a hole for stuffing; fill it with your chosen stuffing (anything from organic cotton, wool, polyester fiber fill, or fabric scraps) and hand stitch to close the hole.
Now you have all the inspiration you need for a perfect gift for a young one (or the young at heart.)
