Gather in and Celebrate Fall…


Fall is a time for gathering in; nesting and preparing for winter. The temperature is crisp and chilly at the beginning and end of each day. The days become shorter and darkness is postponed by turning on the lights, or better yet, by burning candles.

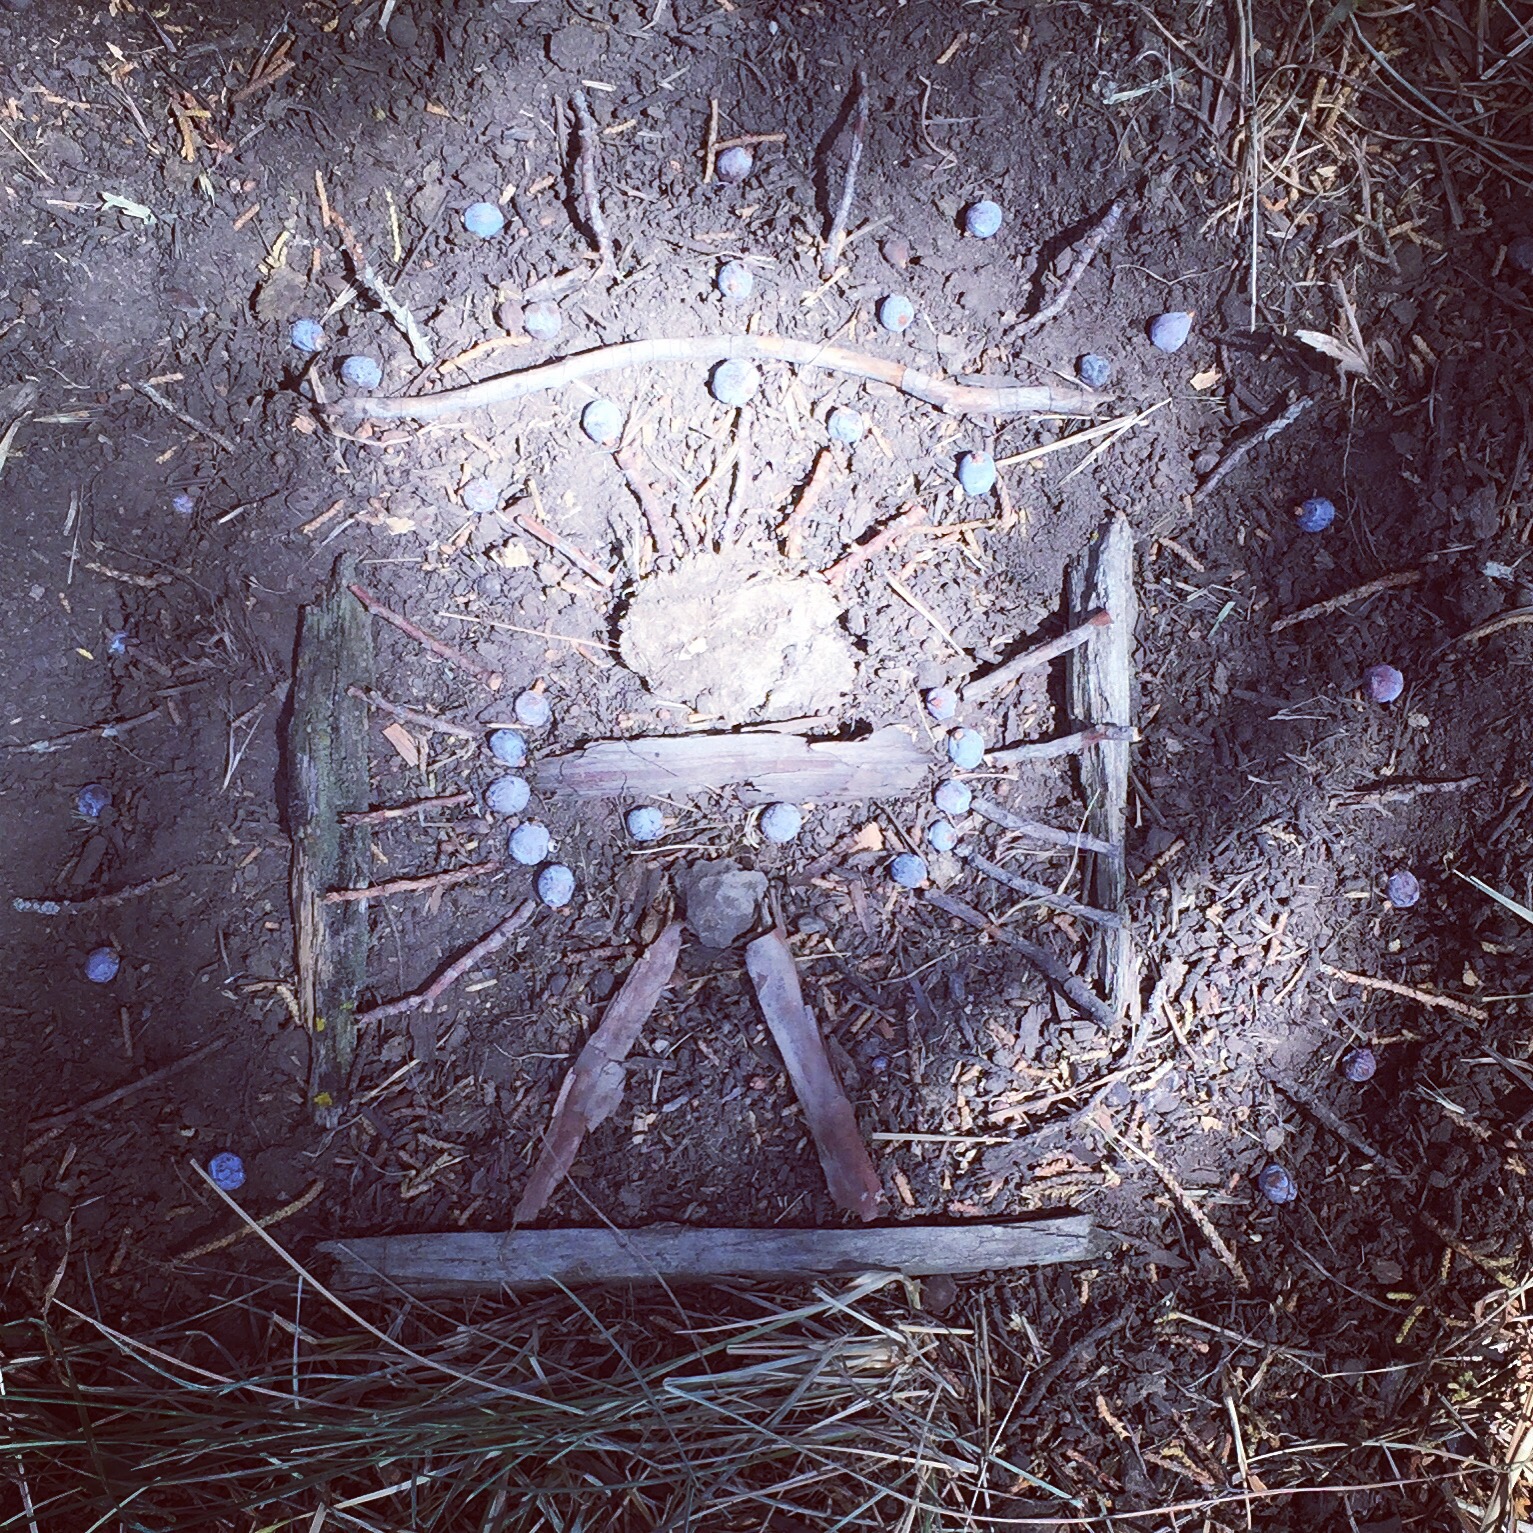
To celebrate the seasonal changes, I created a simple centerpiece based on the concepts of an earth medicine altar. Incorporating representations of the four elements  – earth, sky,  fire, water – the centerpiece is a simple collection of natural and found items. A long irregular piece of leftover felt from a sewing project stretches along the length of the table. Aspen twigs, gathered from around my yard and tied with twine into a sort of effigy, serve as a frame to hold leaves, seeds, and feathers (air) picked up on a walk through the neighborhood. Some rocks (earth) that hold special memories are arranged at one end of the felt. Oil burning candles (fire) are placed at the other end. A few seashells (water) lay near the twigs.

I’d like to say we’ve enjoyed candlelit dinners for the past several nights, but sometimes the best intentions are forgotten in my family’s daily routine.

What treasures can you gather around your home and neighborhood to create a centerpiece altar to celebrate fall?

A wall pocket for an air plant…


Every air plant (Tillandsia) deserves a cozy felted wall pocket. This integral piece is wet felted by hand using a variety of natural brown to black alpaca roving from Flying Dutchman Alpacas here in Bend, OR. The pocket interior reveals a surprise of light cream felt, which blended with the dark roving during the felting process to make the pocket lighter than the background mat. A few of these wall pockets are available in my Etsy store.

A simple no-sew sachet necklace from t-shirt scraps…


Ever thinking of new random projects, this sachet came about as a way to use a 4″ strip of fabric cut from the bottom of a t-shirt. First, the hem and seams were removed to create two long rectangles of fabric. These were then cut in half. By cutting thin strips along the sides and bottom of the rectangle and then tying them together with square knots, a small sachet was created. The remaining fabric was cut into strips, braided, and tied to the sachet with slip knots. Given the light weight and stretch of the t-shirt material, I filled my necklace sachet with tiny flowers and a sprig of rosemary.


Allow the unexpected…

You may have noticed that I am a big proponent of the unexpected; like the centaur who shoots an arrow afar just to follow it into the unknown. It is not that I lack vision when beginning a project. I always have a clear target. I just often miss the mark and have to shift my vision to accept the unexpected.

During my week in the woods of the Sierra Mountains, I found a beautiful, dark sienna rock with a small dimple near one end. It seemed the perfect size and weight for an experiment with weaving. Using hemp twine, I tied larks head knots around the girth of the rock, then knotted several rows of square knots. Never having done this before, I quickly realized that I had used too many larks head knots. So, what was meant to be a snug, knotted wrap for the rock, expanded with each row of square knots to become a pouch to carry the rock; an unexpected, yet satisfying outcome.

Being witness…


Part of my creative process is being witness to everything around me. Being witness means looking and listening with care and attention, moving slowly, noticing as much as possible. Colors are more vivid; objects have more texture and detail; light and shadow are in strong contrast. Being witness always leads me to new creative ideas and inspiration.

While walking along a creek in the Sierra Mountains, I came across two perfect branch pieces – one became a walking stick and the other a talking stick. Aside from removing some remnants of bark, both sticks were left natural. I simply used hemp twine to create a wrapped handhold on each and added a pair of tassels as a minimal decoration.

Drawing on nature…

As a maker, I spend a fair amount of time searching for and collecting (purchasing) materials. In the last few years I have developed a love for thrifting; buying someone’s cast off’s for a bargain price (hopefully.) I have collected enough stuff that I am probably all set for a few months of making – if I didn’t change my mind all the time and follow a new creative whim.

But recently I have been interested in a creative process that involves hunting and gathering rather than purchasing. My own existing stash of materials certainly now qualifies as hunting and gathering. Many times I am going through a bin looking for a particular thing when I come across a long forgotten material. “Oh yea! I wanted to make something with this!”

My own resources aside, I like the idea of seek and find, hunt and gather, in a way that does not COST anything. And by “cost” I mean not only monetary exchange, but any cost to the the safety and well-being of life on this planet.

The image above depicts a nature drawing; just some arranged twigs, juniper berries, bark, and dirt that lay around me as I sat in the shade on a local ranch. Once I leave, the drawing will be erased by wind, rain, and the movements of all the creatures living there. It was a simple exercise in hunting, gathering, and creating with a pure, artistic vision.

As I head out at the end of this week to camp with family in the Sierra Nevada mountains, I will be exploring these creative ideas further. I will make things with my hands in, on, and of the earth. Pure. Simple.

My dilemma with the selfie…

It has been awhile since I posted anything about clothing. I have made several new pieces, but have avoided posting because I am tired of the late night selfies. (Late night because I often don’t get around to documenting and posting until after I get my kids to sleep; and selfies because it fits my budget.) I actually bought a couple lenses and tripod from Photojojo.com to improve my iPhone photos. But the lenses and tripod do not take better photos on their own. So what do I do? I revert to the late night selfie. I figure sharing my making is important even if the photos are less than perfect. You, dear reader, may likely disagree. But I feel compelled to let you know that I have much busier than my blog shows. Really, I have. Currently, I like the feel of a loose tunic shirt. Using an XXL or larger men’s shirt, I create a narrow sleeve but leave the body wide. This style works best on a shirt that has some movement – like a rayon blend. Using a 100% cotton dress shirt would be too stiff. In the photo, I am wearing a linen/rayon blend I transformed today. And what am I wearing below? Those funky pants are an experiment. They are jersey cotton pillowcase pants. Yes, from a pillowcase. I was sifting through my bins of fabric and thrift clothing looking for inspiration when I found the pillowcase and envisioned simple dropped crotch pants and a skirt. I just cut and sewed legs using my serger and then added an elastic waistband into the existing hem. Easy. And so comfortable, although they are not the most flattering. I made the skirt too, but I’ll save that post for another day.

Gathering together and making is strong medicine…

Last month I was fortunate to be invited to lead a craft at Soulodge Fire Circle Retreat; my very first solo retreat; first time away from my little family; first time giving permission to myself to reset, renew, and reconnect. The retreat gathers women interested in earth medicine, so I conceived a simple wet felted medicine pouch, adorned with a slender, wire-wrapped piece of kyanite and hung from adjustable deerskin lacing. Instead of using a more conventional plastic resist to create the pouch, I chose palm-sized river rocks. I wanted the felting process to be as pure and natural as possible – as if we had gathered all the materials on the land. Each woman wrapped her chosen rock in natural alpaca roving and then knelt over a large metal tub filled with hot soapy water to wet, soap, and rub the wool until it was felted tightly around the rock. Cutting a small hole at one end, the rock was then pushed out – sometimes with great effort and humorous analogies to giving birth. The open pouch was then wet, soaped, and rubbed again to complete the felting process. After rinsing, squeeze drying, and hand shaping the pouch, the stone adornment and lacing was added. A slender kyanite stone was wire-wrapped onto the center of the deerskin lacing, which was threaded through two sets of holes punched through both sides of the pouch. The lacing was then secured with two slip knots for adjustability. For anyone who was not able to make a medicine pouch at Soulodge Fire Circle, I’ve made a few felted ones and posted them for sale on Etsy.

Create your own t-shirt yarn…

I will be working with kids from kindergarten through 5th grade on a giant weaving project this Friday. Pictured above is the t-shirt yarn I’ve been making for this weaving adventure. Each ball skein is wound with strips that I hand cut, stretched, and tied from one single t-shirt.

This process works best on a t-shirt that does not have side seams. After cutting off the bottom hem and trimming off the seam, I then the hem along the fold and created two strips of fabric. I pull them to stretch the fabric and make it curl along its length, then tie the strips together. Then I cut a spiral from the bottom of the t-shirt up to the arms – a single 1″ wide strip cut at a slight angle to the bottom of the t-shirt. I continue to cut individual 1″ strips between the arms and then also spiral cut the arms. The only remnants are the ribbed neck and a bit of material below the neck. I tend to prefer fewer knots in my t-shirt yarn, so if a strip is less than 12″ long, I don’t use it in the yarn. But I do save all remnants because they make good stuffing for other sewing projects like my upcycled wool blanket poufs.

The process of creating a single skein of t-shirt yarn takes about 45 minutes. But the effort is worth it when I imagine the vivid colors and textures in the god’s eye.