Wet felting with Pre-K…

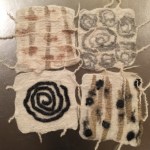
I worked with my daughter’s PreK class on a wet felted project for the upcoming school auction. We are creating a felted wall hanging. Each child made a “pebble” using natural alpaca roving decorated with wool yarn and scrap silk pieces. The background was a collaboration using a darker blend of alpaca roving with the same yarn and silk pieces placed in a random linear pattern. The background is as beautiful as each of the pebbles. Most of the pebbles are hand stitched onto the background with a wool/bamboo blend yarn. Three pebbles are suspended from the bottom of the wall hanging by needle felting pieces of colorful wool yarn onto the background and the pebbles.

From t-shirt to skirt to pants…

A while ago I happened upon a way to make a simple skirt from the top half of a XXL t-shirt. I literally just stepped inside the giant neck hole and said “Hey, this could be a skirt.” The sleeves were flipped inside and sewn shut to form giant pockets and the skirt hem was a simple raw cut edge. It was just that simple. I wore it a few times in the summer. It was funky for sure – even for me. So recently, I decided to alter it a step further and make some low crotch harem pants. Using a second complementary gray t-shirt, I created tapered legs and a folded waistband. They are super comfortable, but clearly an experimental part of any wardrobe. Pants are much more practical in my wardrobe, so I may actually wear these as a funky, feature piece now and then.

Wet felting experiments…

My girls and I are playing with wet felting. In these first experiments we used scraps of tulle, yarn, and beads to add color and texture to the roving. Most of the donate roving was a natural cream color, but one bag was filled with pastel pink, blue and purple. My daughters were ecstatic. The process of wet felting is relatively easy but requires letting go of perfection because wetting and rolling and shrinking makes for some surprising outcomes – at least for us amateurs. I’ll be bringing roving into Stella’s Pre-K class to make some wet felted “squares” with the kids. I’m excited to see what they make!

Upcycle a shirt into an infinity scarf…

This infinity scarf is made from a large piece of soft cotton shirting found at a thrift store. I really like the modern use of a traditional material like plaid. The edges of the fabric are straight-stitched at ¼ inch so there is a controlled fray.

Fleece fringe scarf…

Using the gray fleece leftover from making the mouse ears and tails, I created a couple easy fringe scarves. I’ve previously made and posted pictures of this scarf design in various colors and patterns. Being a minimalist, I prefer the monochrome gray.

Minimal mouse costume…

My daughter Stella required a mouse costume for a performance of the Ukranian folk tale “The Mitten” at her school, so I created ears and tail for 13 Pre-K’ers. As Stella climbed up over all the other woodland “animals” in the mitten at the end of the play, her ears were jostled off. But she recovered her costume and the play ended in laughter and applause.

Handmade crystal ornaments…

Handmade ornaments are my traditional yearly Christmas gift to family. This year I made ornaments inspired by ones that I made for my daughter’s school auction decor. I used gold ribbon, recycled event “Save the Date” cards, gold glitter cardstock, and acrylic crystals to create a simple dangle ornament. First, I threaded about 6″ of ribbon through the acrylic crystal, pulled the ends even, and tied a simple overhand knot at the ends. Using a 1″ diameter hole punch, I cut a bunch of circles out of the event cards and glitter cardstock. I folded each circle in half and then glued them together to create a sphere shape, alternating the glitter cardstock and the event cards. Before gluing the last folded circles together, I wrapped the sphere around the ribbon and then added extra glue to fix the sphere in place.

Natural branch chandelier…

Every Christmas, I alter our holiday decor a bit. This year I created a “chandelier” by suspending a juniper branch over our dining table and decorating it with handmade felted balls, Froebel stars, and crystal ornaments. The benefit of using a natural object for decor is that I can return it to nature when I am finished with it. And if I am lucky, this particular branch can be “found” again next holiday season.

A Modern Advent Calendar Card…

Creating a handmade holiday card is an important tradition for me. I often have a list of creative options that I add to throughout the year and then a final choice just comes to me like an epiphany. I love advent calendars, and I chose to create a modern design inspired by a prefab shed I saw in Dwell magazine. Family photos fill most of the windows and a few additional seasonal decor images theme the calendar for Christmas. Cutting the windows and gluing the front to the back was quite a challenge. I tend to make do with what I have on hand, but I really could have used some special double stick tape. But as days in December were passing, and I was still working hard to complete cards to send, I decided to alter the design from a traditional advent calendar to just a double door card. What is the sense in receiving an advent calendar if half the days have passed? The double door design as easier to execute, so I finished them up and sent them off. Happy (Handmade) Holidays!